FTP settings
For the most basic FTP servers you only need to enter following information to upload data:
- The name of the FTP site and a directory on the site in which the files will be stored once uploaded
- A valid user name and password allowing you access to this directory and
- A file format to upload
Sometimes the FTP server requires additional configuration data. Many of these settings will be allocated to you by your network administrator.
| Field | What to enter |
|---|---|
|
FTP Server |
Enter the name of the FTP site. Omit ftp:// when entering the name. |
|
User Name |
Enter the user name that allows access to the FTP server |
|
Enter the corresponding password |
|
|
Port Number |
The default port for providing FTP connections is 21, but some network administrators change the port number on their FTP servers to increase security and stop hacking attacks. If you wish to learn more about this topic please see any of the published articles on networking and TCP/IP available on the Internet. |
|
Security Protocol |
Choose between none, SSL, TLS or SFTP. You may need to provide additional settings for SFTP. These settings are explained in FTP Settings when connecting via SFTP . |
|
Remote folder |
Enter the folder in which the data files should be uploaded. This needs to include the ftp user's home folder name. |
|
Create Folder |
Select this if the remote folder is not yet present on the FTP site and you wish to create it. |
Your network infrastructure may require you to specify a proxy server. Unless you were given settings by your network or IT administrator leave this at its default value.
| Field | What to enter |
|---|---|
|
Firewall/Proxy Settings |
Use the settings from the registry or choose your own settings. |
Every time you make changes to these settings you should perform a test by pressing the Test connection button. LogTag® Analyzer will
- check you have provided valid connection data,
- if necessary create the folder you have specified and
- put a small test file in the selected location.
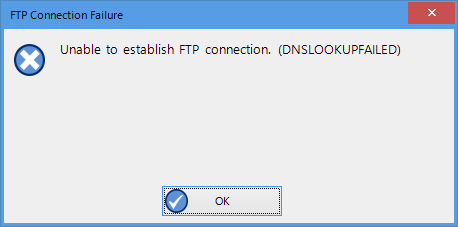
If any of these actions fail, LogTag® Analyzer will display a connection failure message.

Error during communication with the FTP server
Some common errors are:
- The remote folder could not be created or accessed. Select a different folder name, add the required permissions to the desired folder or change to a folder with required permissions.
- LogTag® Analyzer could not connect to the specified FTP site because it could not find it. This could be due to internet connectivity issues, due to an incorrect port number or due to a mis-spelt name.
- User name or password are incorrect.
After you have provided the connection setting, select which files you wish to upload.
| Field | What to enter |
|---|---|
|
Attach file in the following formats |
Select all files you wish to attach when the email is sent. . |
Some of the optional settings in the last section will assist in troubleshooting.
| Field | What to enter |
|---|---|
|
Log uploads |
If enabled, the message exchange between the FTP server and LogTag® Analyzer is recorded into a file. These files are automatically named "FTP Activity Log_YYYY_MM.html" and are stored in the location specified in Logging. A new file is generated each month. |
|
Log Connection errors |
If enabled, connection errors are also logged. This is recommended if you frequently experience upload errors and you wish to discuss this issue with your network administrator. |
|
Store pending uploads between sessions |
This feature is selected by default. If emailing files is interrupted due to a network error, a temporary copy is stored locally, and LogTag® Analyzer will attempt delivery when it is next started. If you no longer wish to send these files, click the Clear Queue button in the Automation window to delete the temporary copy. Your generated data files will not be affected. If the feature is disabled, files not sent when the software is closed will have to be manually re-submitted. |
Once all entries for the FTP server settings have been made, click to save the settings.
FTP Settings when connecting via SFTP
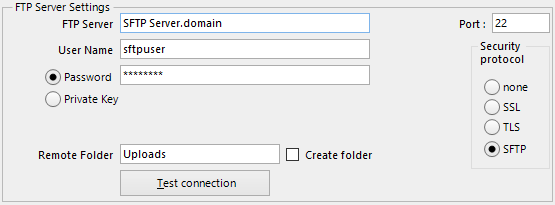
SFTP (SSH File Transfer Protocol) creates an FTP link using a secure data stream. In addition to authentication via Username and Password, LogTag® Analyzer offers authentication via a Public/Private Key Pair.
If you wish to know more about asymetric cryptography please refer to one of the many books or articles available on the topic.
When selecting Password, you provide the same details as you would for a standard FTP connection, except that the default port is now 22.

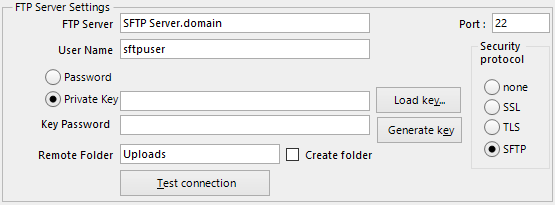
When selecting Private Key, the entries change to allow you to specify the key pair for the authentication.

The key pair is provided via one of three methods:
-
They key pair is generated on the SFTP server, and the public key is added to the list of authorized keys that the server allows by the server administrator.
You will need to obtain and import the private key into LogTag® Analyzer. To do this, click and browse to the private key file you have received. LogTag® Analyzer accepts OpenSSH and PuTTYGen keys. If the key was sent to you in OpenSSH format the file name may not have a file extension, and may not be displayed in the file explorer window that opens after you click . In this case, click the down arrow next to Private Key File and select All files.

The key may be protected by a password. You can enter this password in the Key Password field.
Note: If the key is protected by a password, you must enter this in the password field before you load the key, or you will receive an error message.You should now be able to test your connection.
-
The key pair is generated by LogTag® Analyzer and the private key is instantly added to LogTag® Analyzer.
Generate the key pair by clicking . If you wish to protect the private key with a password enter it before generating the key.
A file explorer window opens and you are asked to save the public key to a file. Browse to a suitable location, enter the name for the key and click .
Forward this file to the administrator of the SFTP server, so you can be included in the list of authorized users. LogTag® Analyzer generates a 2014-bit RSA key (stronger keys can be generated via method 3).
We recommend you create a backup copy of the private key and store it in a safe location. To do this, click anywhere in the private key field and press CTRL-A, then CTRL-C to copy the key to the clipboard. Press the Windows button (
 ) on your keyboard, type notepad and press Enter. Press CTRL-V to insert the contents of the clipboard. Save the file to a private location on your PC. Enter "yourkeyname.ppk" (including the quotation marks) as the file name to save it as a Private PuTTY Key.
Testing your connection cannot be done until the server administrator has advised you that the key has been added to the list of authorized users.
- A third-party program is used to generate they key pair, such as PuTTYgen or SSH-keygen. This would require you to generate the key pair, save send the public key to the server administrator and import the private key into LogTag® Analyzer with the method described above.
Please discuss any further issues with your network administrator.
